


It’s not always fun to be stuck inside in wet weather, especially if you’ve got little ones. We’ve pulled together 14 of our favourite rainy day craft ideas for kids so they can get creative, have some fun and stay dry.
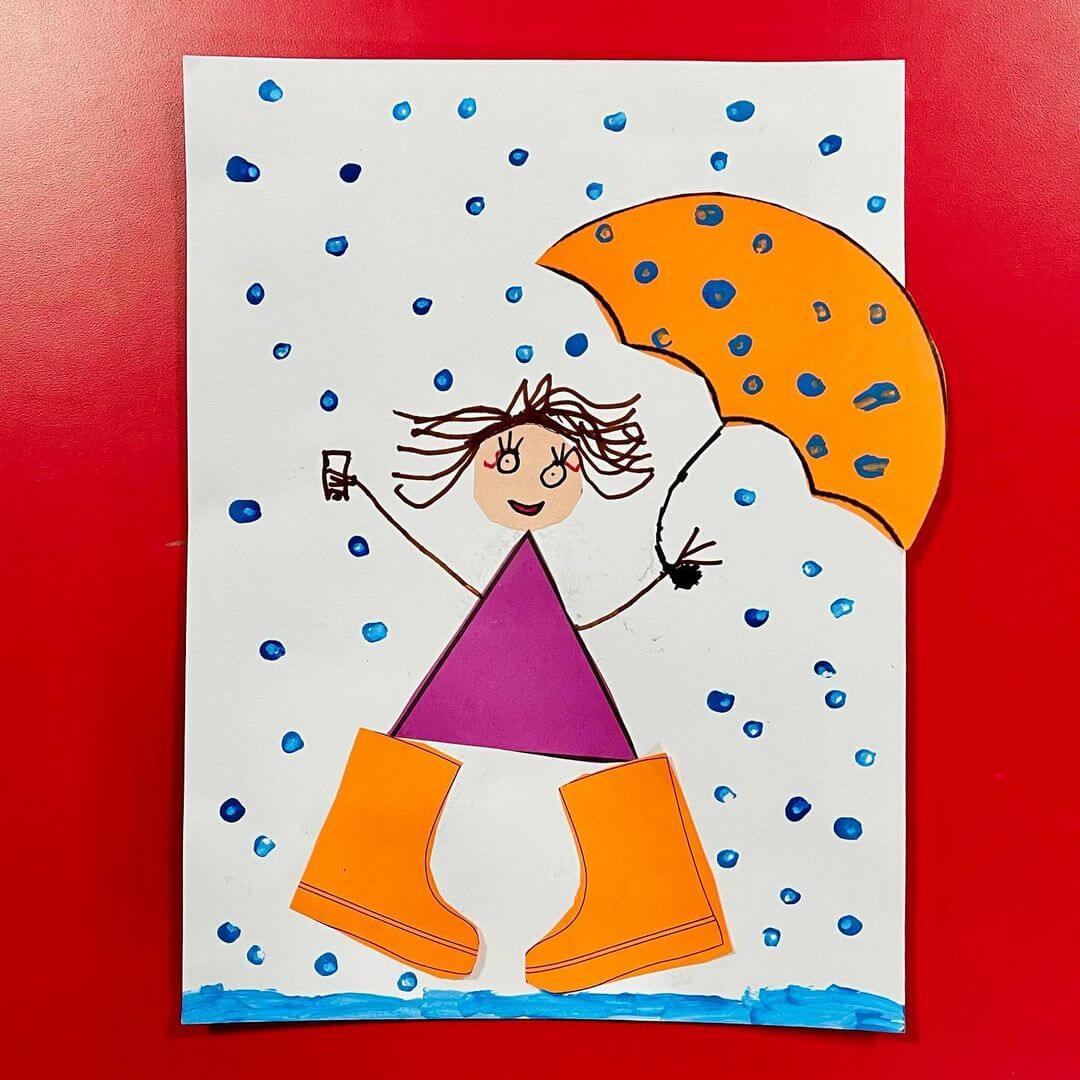
1. Rainy day collage

Image: kikka_arte
When it’s bucketing with rain outside and little artists are becoming restless, a rainy day collage is always a great idea to keep them busy. Whether they collage themselves or just want to have fun, it’s totally up to them how they create!
What you’ll need:
- Coloured paper
- Scissors
- Glue
- A marker
- Blue paint
- small paint brush
Grab some coloured paper and draw an umbrella shape and a shape for the boots. Squares and rectangles make great shapes for the body and a circle shape works for a face, then glue them onto the page. Grab a marker to join the paper pieces together and finish the collage by painting some rain with blue paint, leave to dry and you’re all done!
2. Fingerprint keepsake from clay

Not only does this idea makes for a great gift, it also helps little ones develop fine motor skills and hand eye coordination. Plus, it’s always fun to squish and roll some clay from time to time.
What you’ll need:
- Air dry clay
- Rolling pin
- Fishing line, clay cutting tool or a butter knife
- A straw or the end of a paint brush
- Ribbon to hang
You can follow along with the steps here in our project and turn your fingerprint keepsake into a keyring, decoration, desk hanging or necklace pendant and capture the time before your little artist becomes a big artist.
3. Rainbow heart decals

Image: tinaventurella_rhn
Brighten up a gloomy day with this fun, colourful idea. You can use tissue paper or cellophane for this idea or use some black cardboard to frame your design before sticking it to the window.
What you’ll need:
- Cellophane or tissue paper
- Marker or pencil
- Scissors
- Blue tac or soapy water to stick
Grab some tissue paper or cellophane of different colours and draw some hearts on the paper with a pencil or marker. Cut around the heart shape with scissors (you can layer the paper to save time and cut multiple hearts out), then stick your hearts onto the window using either dish soap and water or blue tac. The light will shine through the hearts, and you’ll have a stain glass window effect!
4. Glitter slime

This idea is great for those days where kids just want to play. Whether it’s an afternoon storm or a wet week and the little ones are getting jittery, this glitter slime activity not only gives them something fun to play around with, but it also helps improve gross and fine motor skills.
What you’ll need:
- 2 tsp green food colouring
- 3 cups shaving cream
- 5 tbs contact lens solution (make sure it has boric acid in it as this is the slime activator)
- 2 tsp of bicarb soda (to reduce stickiness)
- Clear school glue
- Glitter (optional)
We’ve got everything you need to make glitter slime here, plus the glitter is optional - so you won’t have to worry about glitter ending up all over the carpet.
5. Eggshell caterpillar and ants

Image: chlapzeskolky
We love this because it’s also a great way to use up left over bits and pieces and recycle your old egg cartoons. This idea is for those rainy mornings or rainy weekends when you’re looking for a fun project for the little ones that they can play with later on.
What you’ll need:
- Egg cartons
- Poster paint
- Craft Glue
- Scissors
- Pipe cleaners
- Googly eyes
To start, trim the egg carton (you can cut a dozen eggs in half for the caterpillar and half again for the ant). Then reach for the paint brushes out and get painting! Once dry, cut the pipe cleaners to create antennas or little legs on the ant, then attach them using glue. Add your googly eyes with glue then leave to dry. Once dry your caterpillar and ant are ready to play in the garden.
6. Mini canvas paintings

This mini canvas painting is great for play days, parties or if you’ve got more than one little artist to entertain. In this mini canvas painting project, the little ones will get their own mini canvas keepsake to paint and enjoy, and once they’re dry, you can hold a mini art exhibition.
What you’ll need:
- Poster paints
- Paint brushes
- Paint palettes or old ice-cream container lids
- Mini canvas and easels
We’ve got the handy instructions here, from choosing the colours, to painting the canvas and clean up. This project isn’t just fun to do on a rainy day, it also helps the little ones develop hand eye coordination, mobility and decision-making skills.
7. Pet rock insects

This idea will need a bit of forward thinking before getting started, you’ll need some flat pebbles or rocks to paint your pet rock insects on. Once you’ve got these rocks together, all you need is some acrylic paint, paint brushes and a bit of imagination!
What you’ll need:
- Acrylic paint
- Paint brushes
- Flat pebbles or rocks
- A paint palette or old ice cream container lid
We’ve got a step-by-step video here to show you how to create a ladybug, a bumble bee and a Christmas beetle. Follow along and paint your own or watch the video first and then tackle the project head on, it’s up to you!
If you have little ones who have short attention spans, you can also use googly eyes and craft glue to attach the eyes on instead of painting your own. Or if you have a grey rock, you can create a mouse by adding kitchen string as a tail and gluing on two cardboard ears, adding some wool for whiskers and then paint on the eyes, it’s all up to your imagination!
8. An addition garden

Image: scholarschoice
For an activity for kids that encourages the development of numeracy skills, an addition garden is a great idea that’ll make learning fun. You can use a whiteboard or heavy white cardboard to draw the garden, then encourage your little artist to match up the answer on a flower to the addition sum on the stem.
What you’ll need:
- White board or white cardboard
- Markers (green and black)
- Coloured paper
- Pencil
- Scissors
Depending on your little artist’s age and attention, you can create the garden alongside your little one, or draw the grass on the whiteboard or cardboard first, then add stems to the garden. Add in some addition sums on the top of the stems, then cut out flower shapes on coloured paper. Using a marker, add numbers 1 – 10 onto the flowers (don’t glue the flowers to the board/paper). Then alongside your little one, match the sums with the answer on the flower to complete the garden.
9. Air dry clay bracelets

Have fun with your little artist and create your own bangle with air dry clay. This activity can get a little messy so it’s best to have gloves ready and a work surface that’s easy to clean. It’s a fun project and best of all, you (or someone special) can wear the creation once you’ve finished!
What you’ll need:
- Air dry clay
- Scissors
- String
- Paint brush
- Acrylic paint
- Gloves
We’ve got the steps for this project here so you can follow along. Air dry clay is best for this project because it won’t take too long to dry plus you won’t have to worry about using a hot oven to bake your creations.
10. Feelings chart

Image: heartofblooms_
An important activity for little artists as they learn to express themselves is a feelings chart. This is a great way to have some fun with paints and markers but also a helpful resource for little ones as they develop their emotions.
What you’ll need:
- Cardboard
- A black marker (thick and thin works best)
- Coloured paints
Grab some coloured paint and begin placing blobs into 12 areas, you can use a fingerprint or a small brush to place your painted blobs onto the cardboard. This idea uses 12 emotions but you can make as many as you’d like. Once the paint has dried, add your faces to the blobs with a marker. You might like to ask your little one how their face might look when they feel scared and how it might look if they feel happy, as you work alongside them. After adding the faces, describe the emotion underneath. Finish by adding your title to the guide above. Next time your little one is feeling overwhelmed, this guide can help them communicate and identify their emotion.
11. Trinket trays

For artists who might be a little older, this trinket tray project is a great rainy day craft idea.
A trinket tray is not only simple to make, but also fun to paint and it’ll help them keep their little bits and pieces, like jewellery, all in the one place.
What you’ll need:
- Air dry clay
- Paint brushes
- Coloured paints
- A circular dish or lid
- Butter knife
- Cling wrap
- Rolling pin
We’ve got the steps to create a coloured clay trinket dish with air dry clay, plus how to paint three designs onto the tray. We’ve got a pink daisy, rainbow and cloud design that we’ll step you through, but feel free to experiment and design your own painted trinket tray.
12. Paper bag puppies

Image: lesamisdenathalie
These paper bag puppies are super cute and they can be used as little hand puppets on a rainy day too. This idea is also handy if you’re looking to use up some left over coloured paper.
What you’ll need:
- Paper bag
- Graphite pencil
- Black marker
- Coloured paper or cardboard (black, pink, red, white)
- Scissors
- Glue stick or craft glue
A rectangular shaped paper bag works best for this project, grab one and begin drawing shapes for the dogs ears onto black cardboard/paper using a graphite pencil. Then draw a tail shape and cut around. Reach for some red paper and add a tongue shape, some pink for the nose (or you can colour white copy paper), then add some white paper for two eyes. Next, colour the white paper with a black maker for the pupils (a shortcut is to use googly eyes) then grab a glue stick or craft glue and attach your pieces. Once dry, your paper bag puppy is ready to play!
13. Toilet roll bumble bee

Image: anja.mohr.18
This bumble bee will bring a bright smile to a dreary day, plus it’s a great way to recycle toilet rolls and use up any left over bits from the craft box, which is always a bonus!
What you’ll need:
- Toilet roll
- Black marker
- White cardboard
- Scissors
- Pipe cleaners
- Yellow paint and brush
- Glue stick or craft glue
Start by painting your old toilet paper roll with yellow paint, while this is drying, grab some scissors and cut out a shape for the wings on white cardboard. Then cut two small circles for the eyes. Once the paint has dried, you can glue the wings and eyes onto the bee, then bend a brown pipe cleaner in half and cut it for the antenna, secure this with glue. Next, using a black marker draw three bands for stripes on the bottom. Finish by adding the face details and colouring the pupils in, then your bee is ready to play with!
14. Mini aquarium

Image: funmammasa
When the weather isn’t too great outside, a mini aquarium is a fun way to visit an aquarium if you can’t get there yourself. You’ll need to grab some sticks or small twigs for this project, so a little forward planning will help avoid any disappointment.
What you’ll need:
- Shoe box
- Blue paint and paint brush
- Sticks
- Scissors
- Craft glue
- Marker
-Coloured paper or foam
- Sticky tape
Paint the shoe box with blue poster paint, while you wait for this to dry, you can start cutting your fish shapes and extra details like seaweed from foam or coloured paper. Once the paint is dry, grab some sticks and pop them through the box (you’ll need to cut the top of the box and slide the stick through). Then attach the fish to the sticks using craft glue and the leaves with sticky tape. Don’t forget to add details to your fish using markers (think eyes, fins and tails). Once the glue has dried, your aquarium is all done!
If you’re looking for more projects to get the creative juices flowing, check out our projects here. Or if you need some more supplies, check out our kids range here.
We hope that you feel inspired to create your own rainy day craft for yourself and #montmarteart or tag us @montmarteart on Instagram or Facebook, we’d love to see what you create.